What you are actually building
The November 2 Threads demo by @vincent_aidev appears to show a 3D object standing on the phone screen and turning as the phone tilts. The reconstruction described here does not create a live 3D object. It uses a short orbit video, splits it into still frames, and displays the frame corresponding to the phone's orientation. Tilt one way to move backward through the orbit; tilt the other way to move forward. The generation uses a MiniMax H3 LoRA. The tilt synchronization is a separate viewer stage reconstructed from the demo's explanation, not an official tool supplied by the LoRA authors.
You need a working local MiniMax H3 Ref2VA setup. The instructions below use ComfyUI; other compatible setups will require equivalent LoRA loading and prompt configuration. Add one photo with a clear subject, and a phone. Budget for the honest limits at the end before you fall for the cleanest demo clips: the author trained the orbit LoRA on rendered objects, and says so.
Step 1: Pick the right file — orbit first, card second
Download from the MATLOWAI repository on Hugging Face. For the orbit itself, use minimax_h3_orb360_step1500.safetensors. The step-1500 version was trained on gray-backdrop Blender renders of 23 objects, covering 345 one-turn clockwise orbits at different camera heights. The author tested it on three held-out objects, using one seed for each. It is the recommended file for multi-view work, but that limited evaluation should not be mistaken for broad validation on real photographs.
Both LoRA files are distributed under the MiniMax H3 Community License Agreement, not MIT. Check the license terms before incorporating them into commercial projects.
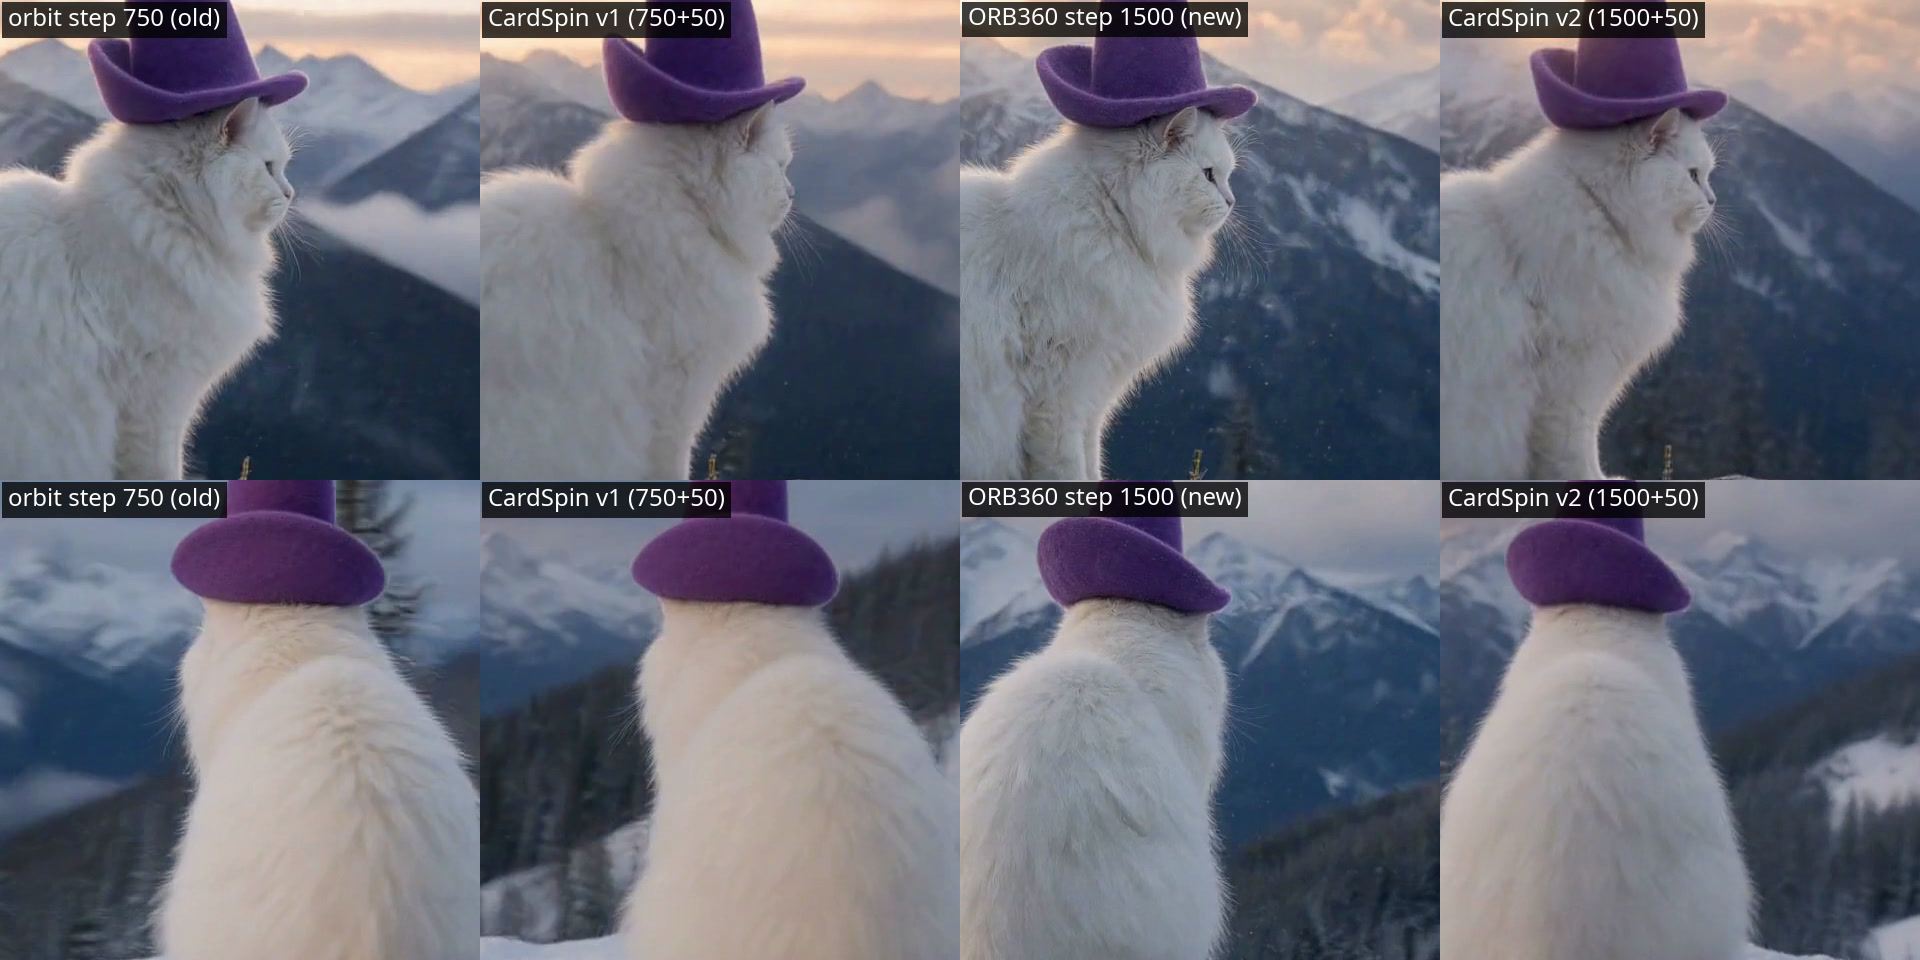
Reach for minimax_h3_orb360_cardspin_v2_step50.safetensors only when the photo itself turning like a physical card is the effect you want. CardSpin began as an accident: testing the orbit LoRA on an 1867 portrait, the model decided the photograph was the object and turned it in space. The author trained 50 extra steps on that single clip to make the accident repeatable. In the author's single-photo comparison, CardSpin v2 retained about 37% of the step-1500 version's measured fine-detail score: 20.7 versus 56.1 in Laplacian variance. The author's first-frame comparison also favored step 1500, at 28.5 dB PSNR and 0.87 SSIM against the source photo, versus 22.5 dB and 0.77 for CardSpin v2. These are the author's measurements on one test photo, not a general benchmark across subjects. Step 1500 for orbits, CardSpin only for the card trick. That is the author's summary, and the numbers back it.

Step 2: Generate the orbit (Ref2VA)
In ComfyUI, load the LoRA with the standard Load LoRA node, model-only, at strength 1.0, on a MiniMax-H3 Ref2VA model. No custom nodes are required. Give it your photo as the reference image and use one of the prompt files from the repository's prompts/ folder rather than writing your own from scratch: orbit_realscene_caption.txt for one photo where the real surroundings should survive, or orbit_3ref_caption.txt if you can supply front, 120-degree and 240-degree views of the same subject.
Keep the clip at 124 frames and 24 fps. The prompts are timestamped against that length ("at 1.708 seconds, frame 41, 120 degrees"), so changing the frame count quietly breaks the camera path. The author's examples run 20 inference steps, at resolutions including 1024×768 and 800×800. Keep both audio sections of the prompt set to N/A, following the repository's examples, to request a silent output rather than an audio track.
Separate FL2VA workflow — do not use these settings with the MATLOWAI Ref2VA LoRAs. If your local setup uses the FL2VA variant of H3 instead, Pablo Dawson publishes a different orbit LoRA specifically for that path. Load the same image as both the first and the last keyframe, at 768×768, 73 frames, 28 steps, strength 1.0, and the clip loops back onto its own starting frame. Different adapter, different base variant. Do not mix the two recipes.
Step 3: Check the orbit before you build anything on it
Watch the full turn before exporting frames. The two failures to look for are the ones the author lists. First, invented backs: from one photo, every side the camera has not seen is made up, so a product logo, a face in profile or text on the far side will be fiction. The fix is the three-reference prompt in Step 2, not a better seed. Second, height: prompts asking for an orbit above or below the photo's own level do not hold on real photos yet — in the author's test, an eye-level photo asked to orbit 35 degrees above or 20 degrees below stayed at eye level both times — and asking the height to change mid-clip makes the object tumble instead of the camera moving. Keep the orbit at the photo's height and the demo effect survives; improvise beyond that and it does not.
Step 4: Export the frames
Export the finished clip as an image sequence, one file per frame, in order. Any standard video tool does this; in ffmpeg terms it is a one-line frame dump of the MP4. You should end with 124 stills, numbered, frame 0 being the reference view. This folder of stills, not the video, is what the phone stage consumes. If you also want a shareable looping video for social posts, keep the MP4 as well. The tilt version and the video version are two different deliverables from the same render.
Step 5: Sync the frames to the tilt
This is the stage the demo's comment thread explains, and it is the stage with no official tool attached, so treat it as a small build rather than a download. Load the frame sequence into a simple viewer on the phone — a small web page is enough — and map the phone's tilt angle to a frame index: level shows the middle frame, tilting one way walks the index backwards through the orbit, tilting the other way walks it forwards. Smooth the mapping (a few frames of easing) or the image will jitter with your hand. What is actually happening is frame selection, which is why the effect does not require a depth camera or real-time 3D rendering. It should work on a compatible phone and viewer with access to device-orientation data, subject to browser support and any required motion-sensor permissions.
Two honest caveats. The CardSpin variant is the better source for this stage if you want the photo itself to behave like a card, and the orbit LoRA is the better source if you want the camera to travel around a subject; the demo effect sits between the two, and your subject decides. And the whole illusion depends on the orbit being clean: any wobble, invented detail or height drift in Step 3 becomes very visible once a hand is scrubbing through the frames.
Sources
- [1] MATLOWAI, "MiniMax-H3 ORB360: 360 orbit + CardSpin", Hugging Face model card (primary; read first-hand — the file table and 597 MB fp32 sizes, rank 32 and alpha 32, training on grey-backdrop Blender renders of 23 objects in 345 one-turn clockwise orbits, the three held-out test objects at one seed each, the white-cat detail table (56.1 vs 20.7 Laplacian variance; first-frame PSNR/SSIM 28.5 dB / 0.87 vs 22.5 dB / 0.77), the standard Load LoRA settings at strength 1.0, the prompt files and their timestamp format, the stated camera-height limits, and the MiniMax H3 Community License Agreement)Read source
- [2] ComfyUI Wiki, "MiniMax H3 360 Orbit LoRA for ComfyUI: One Photo, Full Orbit", September 27, 2026 (the separate FL2VA orbit LoRA by Pablo Dawson; settings as published — the same image as first and last keyframe, 768×768, 73 frames, 28 steps, strength 1.0; read first-hand)Read source
- [3] @vincent_aidev, Threads demo and comment thread, November 2, 2026 (inspiration; the tilt-sync three-stage breakdown)Read source
- [4] yama-kiyo, "MiniMax-H3 ORB360 Vertical-LoRA", Hugging Face (related community variant; confirms MATLOWAI as the ORB360 author and the Ref2VA base)Read source